
There are times when the popular commenting service Disqus is not a good fit. We recently launched GDPR Busters, a site dedicated to busting GDPR myths and helping organizations with compliance. This site is powered by the Ghost blogging software, which has no built-in commenting system, so we needed to setup our own. Being a website about GDPR, we wanted to follow the principle of data minimization, which is why we needed a commenting system that allows anonymous posting and which doesn't require to be hosted by a third party.

While we wrote our own self-hosted commenting system in the past, Juvia. we no longer maintain it actively. We do not want to take on the burden of maintaining the commenting system's codebase. Our search for an open source commenting system that can be integrated into Ghost eventually led us to Isso, which is written in Python.
In this article I'll show you how to install Isso on an Ubuntu server, how to integrate it into Nginx through reverse proxy, and how to integrate it into any website.
1 Installing Isso
The recommended way to install Isso is through pip, the Python package manager. Ubuntu also provides a package through APT, but unfortunately it is broken.
It is also recommended that you make use of virtualenv, a tool for managing isolated Python environments.
I actually think that something like virtualenv shouldn't be necessary. But alas, the way the Python package management system works makes it so that using virtualenv is a good idea.
Start by installing pip, virtualenv, and a compiler:
$ sudo apt install build-essential python-dev python-pip virtualenv
Next, create a virtualenv directory in /opt/isso:
$ sudo virtualenv /opt/isso
Then open a root shell and activate the created virtualenv:
$ sudo -H bash
# source /opt/isso/bin/activate
Inside that root shell with virtualenv enabled, install Isso and GUnicorn:
(isso:virtualenv)# pip install isso
(isso:virtualenv)# pip install gunicorn
Finally, exit the root shell:
# exit
2 Creating a user
We want Isso to run as a separate, unprivileged user so that any problems or vulnerabilities there do not fully escalate to the rest of the system. Create a user account:
$ sudo adduser isso
3 Creating data directories
Isso stores its comments in a database file, and it logs activity to a log file. So let's create directories for storing those files:
$ sudo mkdir /var/lib/isso
$ sudo mkdir /var/log/isso
We also make sure that those directories are owned by user 'isso':
$ sudo chown isso:isso /var/lib/isso
$ sudo chown isso:isso /var/log/isso
4 Configuring Isso
We configure Isso with a configuration file. Create /etc/isso.cfg with this content:
[general]
name = comments

; database location, check permissions, automatically created if not exists
dbpath = /var/lib/isso/comments.db

; Your website or blog address (not the location of Isso!)
; You can add multiple hosts for local development
; or SSL connections. There is no wildcard to allow
; any domain.
host = https://www.example.com/

;To moderate comments, either use the activation or deletion URL in the logs
;or use SMTP to get notified on new comments including the URLs
;for activation and deletion:
;notify = smtp

[moderation]
enabled = false
purge-after = 30d

[smtp]
host = localhost
port = 25
security = none
from = info@example.com
timeout = 10

[guard]
; Enable basic spam protection features, e.g. rate-limit per IP address
; (/24 for IPv4, /48 for IPv6).
enabled = true
ratelimit = 2
direct-reply = 3
reply-to-self = false

[markup]
options = strikethrough, superscript, autolink
allowed-elements =
allowed-attributes =
The main items to customize are:
name-- pick a name for your Isso installation. This name will be used as the prefix in the Isso API URI. In the above example, Isso API endpoints will be made available under /comments.dbpath-- filename of Isso's database file.host-- the URL to your website. This is not the URL to the Isso API endpoint.- The
[smtp]section. This configures how Isso should send emails. On many servers, an email server (e.g. Postfix) is already running on localhost port 25, but if you're using an external email server then be sure to point to that instead.
See the Isso server configuration reference for more information.
Ensure that this file is owned by root:
$ sudo chown root: /etc/isso.cfg
$ sudo chmod 644 /etc/isso.cfg
5 Create a systemd service
We want the OS to manage Isso: to boot it during system boot, to restart it when it crashes, etc. So we register a systemd service.
First, we need to create a boot script. Create a file /opt/isso/isso-start.sh:
#!/bin/bash
set -e
source /opt/isso/bin/activate
export LANG=C.UTF-8
export ISSO_SETTINGS=/etc/isso.cfg
exec gunicorn -n gunicorn-isso -b 127.0.0.1:1927 --preload -w 4 --log-file /var/log/isso/isso.log isso.dispatch 2>>/var/log/isso/isso.log
This script starts Isso on port 1927 using GUnicorn. It also spawns 4 worker processes. If you want Isso to listen on a different port, or if you want more worker processes (for more concurrency) then be sure to change these parameters.
Make sure the script is owned by root and is executable:
$ sudo chown root: /opt/isso/isso-start.sh
$ sudo chmod 755 /opt/isso/isso-start.sh
Next, create a systemd service file /lib/systemd/system/isso.service:
[Unit]
Description=isso commenting system

[Service]
ExecStart=/opt/isso/isso-start.sh

Restart=on-failure
TimeoutSec=1
User=isso

LimitNOFILE=16384
LimitNPROC=16384
LimitLOCKS=16384

# ensures that the service process and all its children can never gain new
# privileges.
NoNewPrivileges=true

[Install]
WantedBy=multi-user.target
Give the file the proper permissions:
$ sudo chown root: /lib/systemd/system/isso.service
$ sudo chmod 644 /lib/systemd/system/isso.service
Finally, start and enable the Isso service:
$ sudo systemctl daemon-reload
$ sudo systemctl enable isso
$ sudo systemctl start isso
6 Configure Nginx reverse proxy
Edit your website's virtual host configuration and make sure that you reverse proxy /comments (or whatever you configured in Isso's name option) to Isso's port (in this example, 127.0.0.1:1927):
location /comments {
    proxy_pass http://127.0.0.1:1927/comments;
    proxy_http_version 1.1;
    proxy_redirect default;
    proxy_set_header Host $host;
    proxy_set_header X-Forwarded-Host $host;
    proxy_set_header X-Forwarded-Server $host;
    proxy_set_header X-Real-IP $remote_addr;
    proxy_set_header X-Forwarded-For $proxy_add_x_forwarded_for;
    proxy_set_header X-Forwarded-Proto $scheme;
}
Then restart Nginx.
7 Insert Isso into website
Now that Isso is up and running, the last remaining thing to do is to insert Isso into your site. Insert this snippet in the place where you want to display the comment box:
<section id="isso-thread"></section>
Then just before </body>, include the Isso Javascript:
<script data-isso="/comments" src="/comments/js/embed.min.js"></script>
(See Isso's client configuration reference for more options.)
Et voilà, a commenting section:
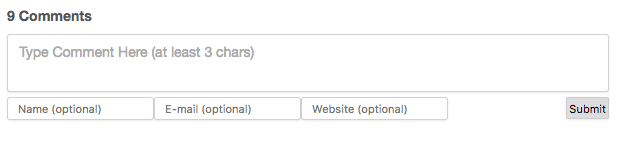
Enjoy Isso!
 Follow on Github